
Your guide to the best local shops, markets, retailers, suppliers
and artisans in Stroud, Nailsworth and across the Five Valleys
Thursday, 7 July 2016
Watch the birdy
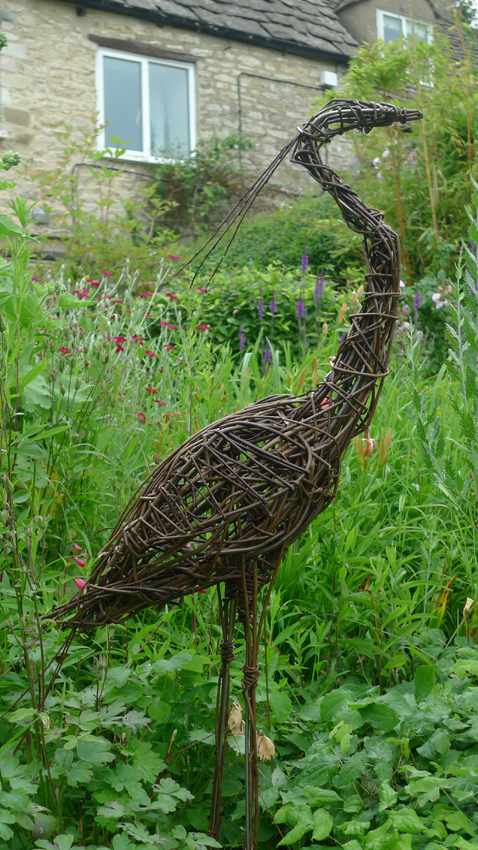
I know there are many fantastic willow weavers who run courses in the Five Valleys including Susan Early (email: susanearly@btinternet.com), Sheila Winter (write to: Sheila Winter, 4, Trinity Rd, Stroud, Glos. GL5 2HX) and Norah Kennedy (www.norahkennedywillowworker.co.uk/) but I was invited to join a group of friends at the Willow and Wetlands Visitor Centre (where they make the best Fortnum & Mason's hampers!) at Stoke St Gregory in Somerset for a willow sculpting workshop. I had seen Sarah Le Breton's leaping hares outside Linley's this year for the Chelsea Flower Show (www.davidlinley.com/blog/chelsea-flower-show-23rd-to-28th-may/) so I knew I was in for a treat and I was not disappointed. We all made different animal sculptures and, fearing making a complete numpty of myself, I chose what I thought would be the easiest option - a 5ft heron. I needn't have worried. With boundless enthusiasm Sarah was able to help everyone create a bespoke piece to take home. Besides wading herons there were sitting hares, leaping hares, a fox and even a dachshund! I'm already thinking about another workshop... maybe this time I'll be brave and go for the dancing hare.


Wednesday, 29 June 2016
Beary sweet
Introducing new boys on the block - teeny tiny needle felted jointed teddy bears. I'm hoping to do a one day workshop for these little fellows (if we get enough interest) at Mother Goose. Cost will be £35 plus materials (not a lot cos they're so little). Let me know if you're interested. I have to say this is the most therapeutic of all the crafts I've been doing. Frenetically stabbing a ball of wool has exponentially reduced my stress levels post Brexit (particularly as I gave them names from the get-go). Sooo...let me introduce you to BoJo and F'raj!


Thursday, 16 April 2015
Out of the Attic
It's been some time since I last posted anything...that's because I won't post unless I've found something really inspiring/interesting. But coming up fast is SIT Select Trail- an event that really shouldn't be missed. You can find their gorgeous free brochures in and around Stroud and Nailsworth or go on line http://www.sitselect.org/ for more information on events and dates. There are so many exhibitions to visit, but I'm definitely not going to miss one in particular - Beastly Magic which is on at Sofa & Stuff at Woodchester Mill from Saturday 2nd May - Monday 25th May. A host of exhibitors from ceramicists to basket makers, screen printers to wall paper designers will be displaying their skills. As a teddy bear maker I'm particularly keen to visit Karen Suzuki of Nameless Wonders - see one of her creations below.

Meanwhile there's our local toy workshop held at Mother Goose every Tuesday morning (10am til 12.30pm, £12 drop-in or £60 for a six week term) for those who'd like to make toys from a bygone era. Fully jointed and aged - they're supposed to look like they just came out of an old trunk in the attic! We make Stieff style teddies, bunnies and heffalumps. After learning the basics of jointed toy-making we always try and encourage people to design their own patterns. Come and join us now spring is sprung.


Meanwhile there's our local toy workshop held at Mother Goose every Tuesday morning (10am til 12.30pm, £12 drop-in or £60 for a six week term) for those who'd like to make toys from a bygone era. Fully jointed and aged - they're supposed to look like they just came out of an old trunk in the attic! We make Stieff style teddies, bunnies and heffalumps. After learning the basics of jointed toy-making we always try and encourage people to design their own patterns. Come and join us now spring is sprung.
Saturday, 4 October 2014
The new arrival
Here's a cheeky chappie I made from lovely Schulte mohair fabric (the one used by Steiff to make their bears) from Mother Goose in Nailsworth. He's the bear we're making at the Teddy Bear workshop beginning next week (Tuesdays from 10 til 1). He's been deliberately 'aged' to match the style of bear - long arms, short legs and a hump! Such a sweet boy - who wouldn't want to make him?


Monday, 15 September 2014
Bear essentials
I am about to do the first bear making workshop with Sandy Young (another bear-maker). It's going to be a three week course run at Mother Goose on the 7th/14th/21st October from 10 a.m. to 1 p.m. The cost will be £75 per person plus materials and the bears range from contemporary to heritage, plain and jointed depending on your ability. It's suitable for beginners and more experienced sewers alike. Call Mother Goose on 01453 298725 for more information and to book. Workshops will be limited to 6 people so there will be plenty of one to one tuition. You'll also be required to do some 'homework'! Below are Gus the Grizzly, Arthur and Oliver - all traditional jointed bears.

Sea of pom poms

I'm starting to feel a certain numbness in my thumbs (RSI?) due to all the pom pom making that's been going on. I've made roughly 175 so I'm guessing I'm almost a third of the way through making a rug - it has to be packed really tightly to achieve the effect I'm after! Check this website for my inspiration: http://www.myk-berlin.com/
Steffi (http://www.mothergooseonline.co.uk/) ordered me some hessian backing so now I've GOT to finish it. This is an amazing way to use up all those odds and ends of wool I have left after knitting projects or following visits to charity shops where I pick up all sorts of yarns. It doesn't matter if it's wool or acrylic, 4-ply, double or Aran, just use what you've got. To make really firm pom poms overfill the pom pom makers, then tape the ends together with masking tape so they don't 'ping' open when you snip the yarn. Tie them with fine string (it's stronger than yarn and doesn't snap) using a surgeon's knot (add an extra twist when tying the first loop to form a double overhand knot) and leaving the two 'tails' to attach to the backing. I'll report back when I'm further along with the project....watch this space!
Monday, 30 June 2014
Felted flowery freaks
Whilst we were preparing to yarn bomb the Nailsworth Festival I started felting a couple of larg(ish) flowers to attach to the railings. Now I'm still something of a felt 'virgin' but I wasn't about to let that put me off. I started making a blue sweet pea and when that went wrong turned it into an iris. It still wasn't working but it WAS starting to resemble a viola. The upshot - a mega distorted pansy. I then decided to try a hibiscus. At least this time the finished piece does resemble a hibiscus flower. Am I put off by? Not likely - it has simply made me more determined than ever to experiment with shapes and colours. If you fancy having a go, Sophie Buckley does needle felting workshops at Mother Goose in Nailsworth (01453 298725) and at Prema in Dursley (01453 860703).

Classy glass
The reason I haven't blogged recently is that I've been busy with numerous classes and workshops. Thought I'd share this one with you. A group of friends decided it would be fun to have a go at Stained Glass and, as we were coming together from all directions, Bristol proved to be the central point. So we booked a one day beginners course at Stoke Lodge Adult Learning Centre. For just £36 plus materials (approx £9) we each of us managed to complete our very own butterfly or dragonfly. It was VERY full on. We learnt design preparation, glass cutting, grinding, copper foiling, soldering and finishing. We all finished up with injuries (entirely self-inflicted!), but ultimately we were incredibly proud of our finished pieces knowing that we'd made them entirely by ourselves. In September Caroline Lambert is running a 10 week course at the Subscription Rooms (01453 760900) for £75 plus materials and there's also a Summer School at SGS Stroud running for 5 days from 14-19 July with Ruth Adams at a cost of £299 including materials - I guarantee you won't be disappointed!

Tuesday, 25 March 2014
Tracing the Blueprint

This in turn reminded me of my unfinished sewing roll that's been in the works for months. I already had the blue check fabric and the felt was from Yards Ahead (www.curtainsstroud.co.uk). I wanted to accommodate the boxes and envelopes of sewing notions that I'd designed for the Amberley Village Store. I'd already finished a rough hand sewn roll and Judy at the Stroud School of Sewing (www.stroudschoolofsewing.com) very kindly spent time trying to teach me the intricacies of the sewing machine...bless....she needed the patience of Job, and it all worked rather well, although I'm not sure I'll be using the sewing machine again any time soon.
Bombs Away!

Wednesday, 19 March 2014
Snug as a bug!


I bought 3kg merino wool roving from Mother Goose and separated it into two strands, twisting the wool gently as I wound it into balls to try and make it stronger. I cast on 32 stitches on a pair of 27mm needles (from Rachel John of Extreme Knitting fame). Steffi Stern at Mother Goose also makes her own extremely lightweight giant needles which are lovely to use.
I then knitted a rib pattern (2 plain, 2 purl) for the length I wanted. Whenever I needed to join the wool I used invisible knots (thank you Kate at Mother Goose knit and natter) which seemed to work well but I'm told felting ends together is better. The whole project probably took no more than a week-end to make in total.
Of course I know this will shed and pill. I expect to use a lint roller after snuggling up underneath it so generally I simply use it as a throw over the bed to minimise fluff! It measures approx. 3.5ft wide by just over 6ft long and I LOVE it!
Thursday, 13 March 2014
Fruit of the loom!

It certainly feels like spring really has arrived...I spent the morning in the garden playing on a peg loom from Mother Goose. I had just found a bagful of wools (some carpet grade) in Emmaus and decided to make a bolster or rug ... can't decide which yet. I'd never used a loom like this before but Steffi's instructions were easy to follow and it just took a little bravery the first time I removed the pegs and pushed down the work. After that it was easy-peasy. For ease and speed of weaving I've used a 'Heath Robinson' contraption made from a plastic bic biro case!
These looms are made by local people at the Nailsworth Community Workshop (Tel 07971 737626). You can achieve amazing results on them using both familiar and unusual materials such as yarns, unspun fleece, rags, even strips of old T shirts and plastic bags - great for recycling. Children and people with learning difficulties find them simple to use and very therapeutic - as did I!
If you want to weave with finer yarn Cornhill Pets and Country Crafts in Stroud have some double peg looms with both wooden and thin plastic pegs which are spaced much closer together.
By the way, Julie Wickham from the Stroud Valleys Project (Tel 01453 753358) is looking for crafty people to make goods to be sold not-for-profit for their charity. If you have any ideas for knitted, crochetted, knotted, embroidered, appliqued or woven handicrafts do let her know. Come on folks - support your local community and get weaving!
Monday, 27 January 2014
Let's build an igloo!

As it is half term you are welcome to bring children along with you, as long as you are responsible for them and ensure they are well behaved and don’t stop others on the course from learning.
The course costs £20 (£17 for Friends) and runs from 10-1 and will help to raise valuable funds for the Stroud Valleys Project charity. All participants will receive an instruction sheet on how to make this sculpture, along with advice on where to source living willow locally.
There are 12 spaces on this course so if you are interested book now!
Sunday, 22 December 2013
Yuletide wreaths & milk bottle angels!
In an effort to get well and truly into the Christmas spirit my friend Val Bowen agreed to show me how to make a wreath from leaves, berries and cones found in my garden (luckily I just got in ahead of the birds for the last remaining berries and rose hips, but of course I'll be feeding them regularly over winter so I don't feel too guilty). We spent all morning wrapping moss round a wire base and fixing with florist's wire. We then made little 'bouquets' of holly/bay/yew leaves with some rose hips and holly stems and berries mixed in. These were wired over the moss, the exposed wire then being covered by other bits of foliage pushed deep behind the original wire wrapping the moss. I also made a 'bouquet' of different shaped fir cones for the top of my wreath...not bad for a first attempt if I do say so myself! Val's lovely wreaths can be found at the plant stall at Nailsworth Country Market every Friday.

For more festive cheer I collected empty 1litre milk cartons, cut angel shapes out following the patterns found in the Winter issue of BuyLOCAL and then decorated each one with Rub and Buff gold paint from Kendrick Street Gallery in Stroud and stuck on sparkly sequins and shapes with PVA glue from Mother Goose in Nailsworth. These look amazing hanging round the room or even outside on a tree.


For more festive cheer I collected empty 1litre milk cartons, cut angel shapes out following the patterns found in the Winter issue of BuyLOCAL and then decorated each one with Rub and Buff gold paint from Kendrick Street Gallery in Stroud and stuck on sparkly sequins and shapes with PVA glue from Mother Goose in Nailsworth. These look amazing hanging round the room or even outside on a tree.


Monday, 2 December 2013
Upcycled Christmas bauble
Having just finished the Winter issue I couldn't resist posting a picture of one of the decorations we're featuring. I raided my button box for various vintage buttons and then got some pearl headed pins, a styrofoam ball and ribbons from Steffi at Mother Goose in Nailsworth and wiled away an hour or so making this upcycled bauble. We also feature lots of other brilliant ideas of Steffi's - so don't miss it!

Wednesday, 23 October 2013
Support your secret garden!


Talented local
artists and art students from Stroud School of Art are busy creating beautiful
works of art for this special weekend exhibition. Rumour has it that there will
once again be an eclectic and fascinating display of postcards adorning the
walls of Gallery 2, textiles and photography as well as drawings and paintings,
perhaps even mosaics and jewellery too.
The first Secret
Artist postcard received this year came from award winning, internationally
acclaimed illustrator and graphic designer Tony Meeuwissen. Tony Meeuwissen has
lived in the Stroud hills and valleys for over 30 years. From album covers to Penguin book jackets, Royal Mail
stamps to award winning books, his intricate and witty designs have delighted
us for decades. His V&A commissioned playing cards ‘The Key to the Kingdom’
won him the WHSmith illustration award, and his Weather postage stamps were
voted 'best loved stamps' of 2001 … the person who’s lucky enough to win Tony’s
work is very, very lucky indeed!
So how does ‘Secret
Artist’ work exactly? As the name suggests its something of a mystery … Art
lovers and Museum visitors are invited to help raise much-needed funds for the
Garden by coming along to the Museum on 16 and 17 November and buying a ‘Secret Artist
ticket’ for £15 before they run out. Each ticket entitles you to one postcard …
but you won’t know which one until a week later when you come to collect it or
when you receive your card by post!
Contact for
further information Abigail Large, Museum Administrator, tel: 01453
763394 email abigail.large@stroud.gov.uk
Detail of the 18th
Century ornamental Walled Garden gate © Steve Russell
Walled Garden
teasels © Dave Cockcroft Tuesday, 22 October 2013
Basket case
There as another basket making day at Stroud Brewery on Sunday 8th December 10am - 4pm. It is open to all. Older/patient children can come with an adult, age 10ish and above. If you're interested, the teacher, Kamar, will show you how to make a Christmas hamper basket using different coloured willow. Bring a woolly jumper in case it's chilly. Also please bring a simple dish to share for lunch. These days usually book up quickly so please email jadebashford@hotmail.com to let her know if you would like a place. The cost is £35 per person including materials. If you book and can't come you will still be asked to pay or to find someone to come instead of you. Here's the basket I made on the last course - it's about 24 ins in diameter and is utterly fab!


Wednesday, 16 October 2013
Fix it for free!
Now here's a clever recycle/upcycle idea...this is a very different kind of workshop. Based on the Repair Café movement in Holland, the aim is to fix or repair any garment or electrical/mechanical device you can get to the café – for free! Hosted by Lee Townsend at the Lockkeepers Café, there will be experienced engineers and sewing/machining volunteers from Transition Stroud to try to fix whatever you bring. You get it fixed (hopefully) - and for free, the planet benefits as you don’t have to buy a new one and we all have a relaxing time over a coffee at your local café.

Date: Sunday October 20th
Time: 2.30pm to 4.30pm
Venue: Lockkeepers Cafe, Wallbridge, Stroud
Cost: Just buy a cup of coffee!
Best to book a slot to let us know if you have clothes to be mended or mechanical/electrical goods to be fixed. So email: erik.w@virgin.net - or ring 07725 900666

Thursday, 15 August 2013
Incredible edible gardens
Congratulations - this year's 'Edible Open Gardens' was another triumph - only this time we had amazing sunshine to enjoy them all in. With fabulous refreshments and a wealth of unusual and innovative ideas to whet our appetites we really don't have any excuses NOT to be growing our own produce. As an 'homage' to the gardeners (I don't have any green fingers at all) I tried my hand at making some pallet planters. I was fairly pleased with the finished results and have been enjoying the fruits of my labour throughout the summer. Admittedly with the fine weather we've been enjoying the barbie has seen a lot more use recently and the herb pallet planter has taken quite a hit! If you weren't keen on growing edible things in pallets then you could try succulents....whatever you plant they look fab, plus they 'd even fit on a balcony if that's all you've got.

The planter on the left contains various herbs, on the right are salad leaves, strawberries and nasturtiums - always remember to wash anything picked from a container like this.

Step 1: Choose a smallish pallet (I asked a local business if they had any untreated pallets not being used). You will also need some waterproof material such as pond liner or in my case an old recycled gazebo cover as well as a large stapler plus of course your compost and plants!
Step 2: Fold your waterproof material around the pallet leaving the top open. Do it as if you were wrapping a Christmas present. Then staple along all the edges using one staple every 4-5 cm.
Step 3: Make sure all the sides are taut otherwise it will look like a pregnant sack!
Step 4: Stand upright and fill with compost to the first space on your pallet. Lean it back down and push your plants into the gap (be firm, you don't want them falling out). Then stand the pallet upright again and fill with compost to the next gap. Repeat the process until you've filled all the gaps.
Step 5: Once all the gaps are filled stand upright and plant the top row. Water well from the top, then lay your pallet at a 45° angle and water again. Leave at this angle for 3-4 days so the plants can 'settle' then place upright in your desired location....voilà!

The planter on the left contains various herbs, on the right are salad leaves, strawberries and nasturtiums - always remember to wash anything picked from a container like this.

Step 1: Choose a smallish pallet (I asked a local business if they had any untreated pallets not being used). You will also need some waterproof material such as pond liner or in my case an old recycled gazebo cover as well as a large stapler plus of course your compost and plants!
Step 2: Fold your waterproof material around the pallet leaving the top open. Do it as if you were wrapping a Christmas present. Then staple along all the edges using one staple every 4-5 cm.
Step 3: Make sure all the sides are taut otherwise it will look like a pregnant sack!
Step 4: Stand upright and fill with compost to the first space on your pallet. Lean it back down and push your plants into the gap (be firm, you don't want them falling out). Then stand the pallet upright again and fill with compost to the next gap. Repeat the process until you've filled all the gaps.
Step 5: Once all the gaps are filled stand upright and plant the top row. Water well from the top, then lay your pallet at a 45° angle and water again. Leave at this angle for 3-4 days so the plants can 'settle' then place upright in your desired location....voilà!
Friday, 26 April 2013
How to make enamel tiles


1 Tapping powdered enamel onto the backs of the 'tiles'.
2 The reverse side when fired.
3 When cooled the 'tile' is placed in the pickling bath.
4 Removing the 'tile'.
5 Washing in water.
6 Pouring 'slip' onto the front of a 'tile'.
7 Tilting the tile in a circular motion to spread the liquid evenly.
8 Allowing any excess to drain, (it's then left to dry).
9 A practise sketch and my etching on the tile.
10 The tile etched and ready for firing.
11 Another practise sketch.
12 The etching on a tile fired with a base colour.
13 A tile with stencil shapes placed in position.
14 Enamel powder seived over and stencils removed, ready for firing.
At the top you can see the various tiles as they've turned out after being fired and cleaned - very cool!
Subscribe to:
Posts (Atom)